Command to grep CPU, Memory , DiskUtilization, Hostname,Number of JVM Running
As an admin its important to know or monitor "Number Of available CPU core" , " available RAM on the server" , "Number of JVMs nunning " , "Current File system utilization " and many more for 100+ servers in just few seconds.
Now a days there are so many good monitoring tool that can provide such data in graphical form but some time these scripts are very helpful specially if you huge number of servers.
( Server Names displayed below are all dummy server, this is just for reference )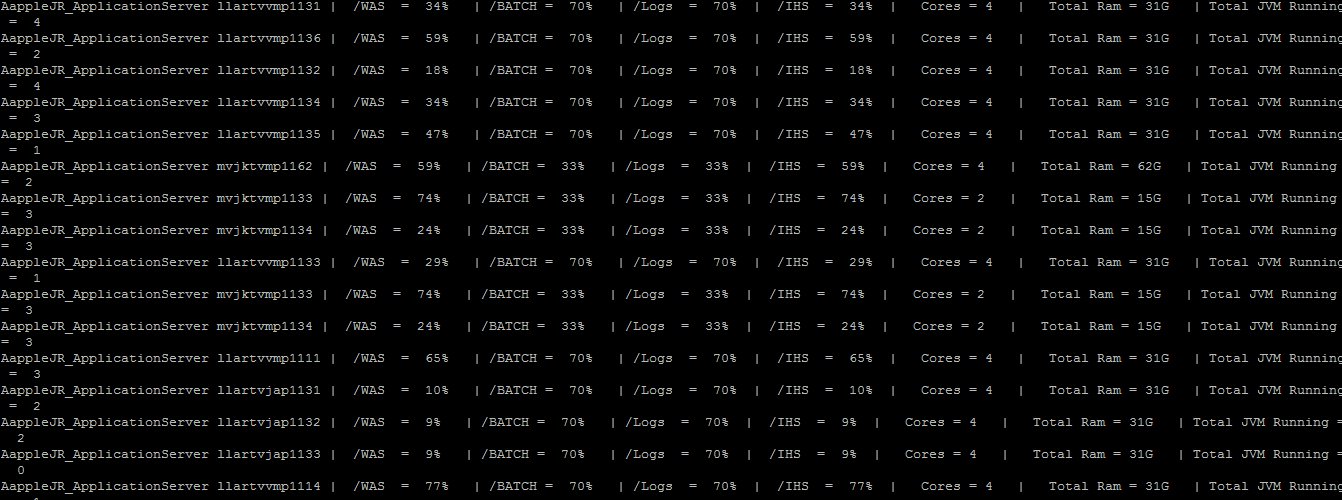
==========================Steps to get such output==========================
Step 1 : Install sshpass package/module on your linux /aix server.
Step 2: create a script file ( for example: InfraserverInfo.sh ) with below mentioned commands ( update it according to your environment ):
sshpass -p 'Password123' ssh wsadmin@Servervmp1131.farmersinsurance.com "/was/scripts/util/systemInfo.sh"
sshpass -p 'Password123' ssh wsadmin@Servervmp1136.farmersinsurance.com "/was/scripts/util/systemInfo.sh"
sshpass -p 'Password123' ssh wsadmin@Servervmp1132.farmersinsurance.com "/was/scripts/util/systemInfo.sh"
sshpass -p 'Password123' ssh wsadmin@Servervmp1134.farmersinsurance.com "/was/scripts/util/systemInfo.sh"
sshpass -p 'Password123' ssh wsadmin@Servervmp1135.farmersinsurance.com "/was/scripts/util/systemInfo.sh"
sshpass -p 'Password123' ssh wsadmin@Servervmp1162.farmersinsurance.com "/was/scripts/util/systemInfo.sh"
sshpass -p 'Password123' ssh wsadmin@Servervmp1133.farmersinsurance.com "/was/scripts/util/systemInfo.sh"
sshpass -p 'Password123' ssh wsadmin@Servervmp1134.farmersinsurance.com "/was/scripts/util/systemInfo.sh"
sshpass -p 'Password123' ssh wsadmin@Servervmp1133.farmersinsurance.com "/was/scripts/util/systemInfo.sh"
sshpass -p 'Password123' ssh wsadmin@Servervmp1133.farmersinsurance.com "/was/scripts/util/systemInfo.sh"
sshpass -p 'Password123' ssh wsadmin@Servervmp1134.farmersinsurance.com "/was/scripts/util/systemInfo.sh"
Please Note :
Replace Password123 by login password for the VM/server.
Replace wasadmin by userid you use to connect to VM/server.
Replace this path by the location of your serverInfo.sh file ( we will discuss about this fine in point 4 ).
Step 4 : Create a file ( serverInfo.sh ) with below mentioned command : ( Please update it as per your environment )
echo "applerjx_ApplicationServer `hostname` | /WAS = `df -h /was | egrep -o '[0-9]+%'` | /BATCH = `df -h /batch | egrep -o '[0-9]+%'` | /Logs = `df -h /logs | egrep -o '[0-9]+%'` | /IHS = `df -h /ihs | egrep -o '[0-9]+%'` | `echo Cores = $(( $(lscpu | awk '/^Socket/{ print $2 }') * $(lscpu | awk '/^Core/{ print $4 }') ))` | Total Ram = `free -h | awk '/Mem\:/ { print $2 }'` | Total JVM Running = `ps -ef |grep /IBM/Websphere/Application/ -modules.jar | wc -l` "
Step 5 : If you have too many servers then create ansible-playbook to copy serverInfo.sh to n-number of server ( Please refer ansible playbook section to copy files from source to target servers ) or we can simply scp this file to target servers.
Now by executing InfraserverInfo.sh , we can execute "serverInfo.sh" script on all remote VMs and can see the output on your cutter VM. ( Screen shot attached above )