3. IBM Installation Manager Installation -Silen Mode
- Download IBM Installation Manager and unzip it under /opt/Installables/IIM
- Download all WAS 8.5 packages and unzip it under /opt/Installables/WAS8.5
- WAS_ND_V8.5_1_OF_3.zip
- WAS_ND_V8.5_2_OF_3.zip
- WAS_ND_V8.5_3_OF_3.zip
- Set up the hard and soft file limits on OS.
$ vi /etc/security/limits.conf
Append: –
* soft nofile 75535
* hard nofile 75535
This may vary based on the OS . Refer the IBM infocenter for more details.
4 Lets Install IBM Installation Manager first, It helps in :
- Product Installation
- Applying Fix Packs
- Rollback of Fixpacks
- Product Uninstallation
You will need X-windows to install Installation manager or other products in GUI monde. Usually in production environment, its not installed. So we will follow silent installation approach as its the best approach.
We will have to have responsefiles.xml ready before executing silent installation command. This can be achieved in two ways:
Download the sample responsefiles.xml and update it
Create a responsefiles.xml using ( -skipInstall option ). Its advisable to record responsefile in non-production machine and then use it for installing IIM on production server.
/opt/Installables/IIM/installc -log /opt/Installables/IIM/install.log -installationDirectory /opt/installationManager/ -acceptLicense
If installation is successful, we may not see any entry in installation log.
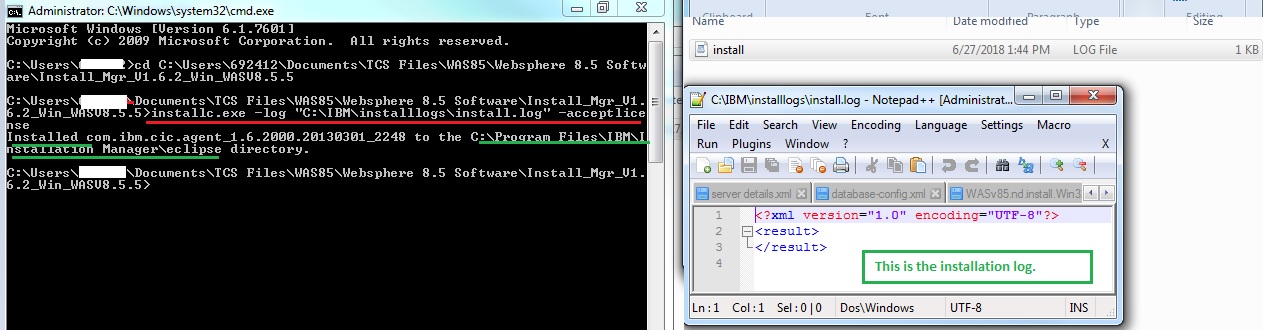
To check installed version , please follow the steps :

4. What Is liberty Profile
It is a functional subset of the full profile of WebSphere Application Server, for both development and production use, with an install size of under 50 MB, a startup time of around 3 seconds. A centralized managed is optionally available through the Job Manager.
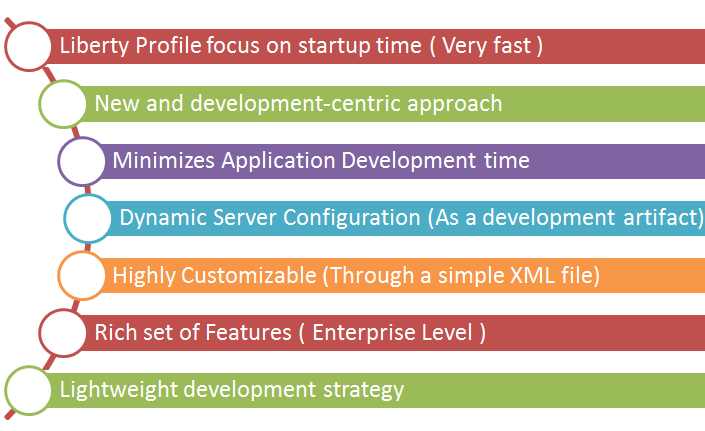
I have explained step by Step setup of Ibm WebSphere Application Server Liberty Profile, in a separate post.
5. What are the ways to create Profiles in WebSphere
There are two ways to create profiles in WebSphere 8 onwards.
- Profile Management Tool
- manageprofiles.sh
Command to Create a Profile:
Syntax:
app_server_root/bin/manageprofiles.sh -create -profileName profile_name -profilePath profile_root -templatePath template_path
Example :
c:\WebSphere\AppServer\bin>manageprofiles.bat -create -profileName Dmgr01 -adminUserName wasadmin -adminPassword H@ppy123 -enableAdminSecurity true -cellName Cell01 -nodeName mercuryCellManager01 -profilePath c:\WebSphere\AppServer\profiles\Dmgr01 -nodeProfilePath c:\WebSphere\AppServer\profiles\App
Srv01 -appServerNodeName Node01 -templatePath c:\WebSphere\AppServer\profileTemplates\cell\dmgr

Command to Delete a Profile:
Syntax :
app_server_root/bin/manageprofiles.sh -delete -profileName profile_name
Example :
If the command is partially successful or unsuccessful, proceed to the next step to delete the profile manually.
- rm -r profile_name
- ./manageprofiles.sh -validateAndUpdateRegistry
You have now deleted a profile and can recreate profile by same name.
7. How to apply fixpack on WebSphere
I am going to perform following activities now :
- Check the existing version of was binaries.
- Apply latest fixpack on the WAS binaries.
- Create two profiles
- ProfileA : It will have default JDK which comes with install WAS
- ProfileB : Upgrade JDK version of Profile B.
Due to some limitations, I am not able to share the screenshots but you can refer the below mentioned commands.
I am assuming that you have installed IBM Installation Manager and IBM webSphere Application Server binaries.
All the below listed commands are working :
a. Download FixPack from IBM passport Advantage. It will usually be two or three separate zip file.
b. Create a directory by name "Fixpack" and extract all three zip files under same directory. So, finally we will have only one directory with all required files. It will looklike:

c. In order to verify the merging of all fixpacks are done in proper way or not, please execute below mentioned command ( Update the command as per your environment).
Syntax: <IIM installation Directory\tools\imcl.exe> listAvailablePackages -repositories <path to Fixpack's repository.config>
Example :
c:\IBM\eclipse\tools>imcl.exe listAvailablePackages -repositories "c:\Users\692412\Documents\TCS Files\WAS85\Websphere 8.5 Software\WebSphere 8.5.5.13 FP\8.5.5-WS-WAS-FP013\repository.config"
The output will be like this :

The fixpack that you have downloaded, comes with many other fixpacks. We just want the last one from the above list of fixpacks.
d. Install the fixpack by issuing below mentioned command.
Syntax:
<IIM installation Directory\tools\imcl.exe> install < Fixpack that you want to install from the above list> -repositories <path to Fixpack's repository.config> -installationDirectory <WAS install Path> -acceptLicense
Example :
c:\IBM\eclipse\tools>imcl.exe install com.ibm.websphere.NDTRIAL.v85_8.5.5013.20180112_1418 -repositories "c:\Users\692412\Documents\TCS Files\WAS85\Websphere 8.5 Software\WebSphere 8.5.5.13 FP\8.5.5-WS-WAS-FP013\repository.config" -installationDirectory C:\WebSphere\AppServer -acceptLicense
e. From websphere Application Server 8.5.5.2 onwards, websphere supports SDJ 7. By default when you execute the above script, your SDK will not get upgraded. It will remain at SDK 6. If you wish to upgrade WAS binaries and SDK version both you can use below mentioned commands.
Syntax:
<IIM installation Directory\tools\imcl.exe> install < Fixpack that you want to install from the above list> -repositories <path to Fixpack's repository.config> -installationDirectory <WAS install Path> -properties user.wasjava=java7 -acceptLicense
Example :
c:\IBM\eclipse\tools>imcl.exe install com.ibm.websphere.NDTRIAL.v85_8.5.5013.20180112_1418 -repositories "c:\Users\692412\Documents\TCS Files\WAS85\Websphere 8.5 Software\WebSphere 8.5.5.13 FP\8.5.5-WS-WAS-FP013\repository.config" -installationDirectory C:\WebSphere\AppServer -properties user.wasjava=java8 -acceptLicense.
f. Once Fixpack is installed, lets verify what the SDK version its supporting

g. You have option to have profiles ( Application Server profiles ), running on the same binaries and may have different version of SDK. Please follow the below mentioned command to change the Supported version of SDK for your profile.
First Verify, whats the current version of your profile. Created a profile and execute "Ps -ef |grep java"

Execute below mentioned command to update the SDK version . You can either update SDK for all profiles or any individual profile:
Syntax :
![]()
Example:
![]()
Restart you servers. Your WebSphere Environment is now ready for configuration and deployments.
Request : If you like the post, please share your feedback.
8 . How to enable WebSphere Application server shutdown - Without Asking Password
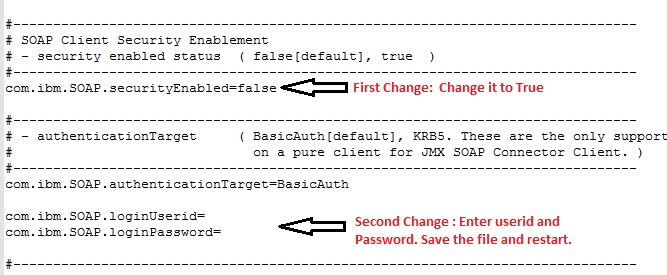
We have created Dmgr01 profile and enabled security during profile creation. Now, when we are tying to stop the Dmgr01, its challenging me to enter the password. We can follow below mentioned simple steps to stop the server without passing credentials:
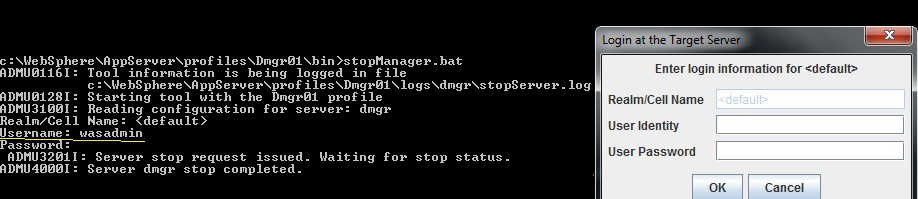
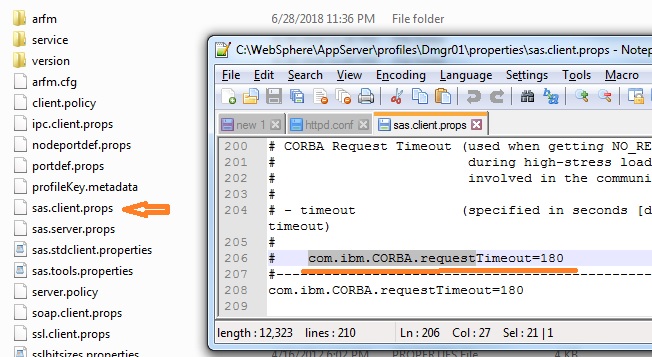
Step 1: Go to soap.client.properties and open it in vi mode:
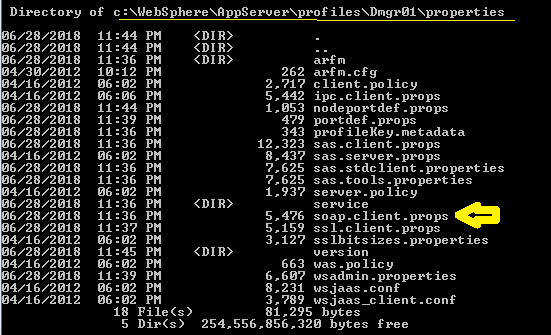
and make following changes:
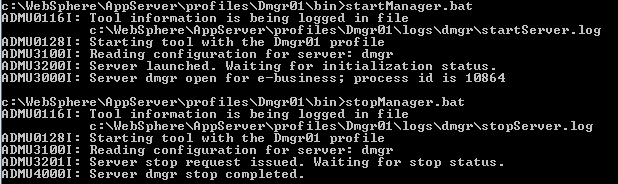
Lets validate the changes are reflecting properly or not by performing the restart:
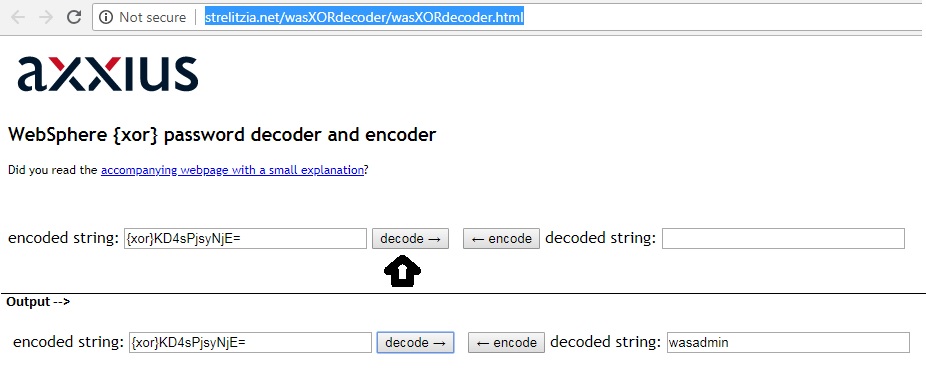
9. How To encode and Decode your WebSphere Password
KeyStore implemented in WebSphere Application Server uses XOR encryptor & decryptor :
Step 1: http://strelitzia.net/wasXORdecoder/wasXORdecoder.html
Step 2: You can use this page to encrypt or decript your websphere passwords:
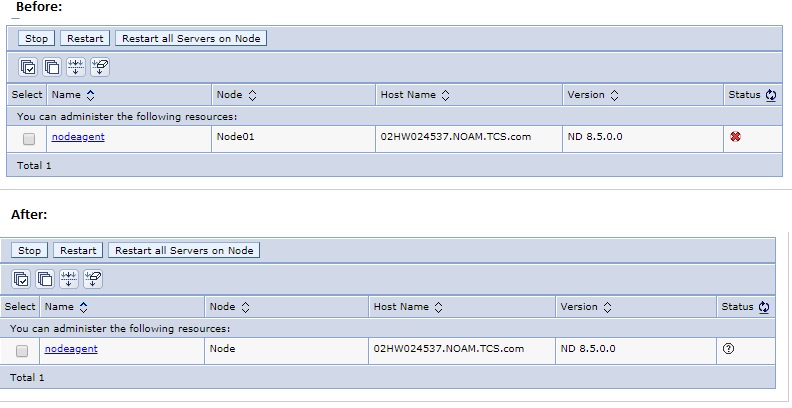
How to Rename WebSphere Node Name or WebSphere Cell Name
AdminTask.renameNode('[-nodeName Node01 -newNodeName Node]')
1. connect to dmgr process;
./wsadmin.sh -lang jython -conntype NONE
2. change cell name and save.
AdminTask.renameCell('[-newCellName Cell02 -regenCerts true -changeSetupCmdBat true]')
AdminConfig.save()
3. change node name and save.
AdminTask.renameNode('[-nodeName Node01 -newNodeName Node]')
AdminConfig.save()
Also, you can rename it interactive mode,
AdminTask.renameCell ('[-interactive]')
AdminTask.renameNode ('[-interactive]')
Example :

How to configure IHS , Plugin and WAS to communiticate together
We just need to let webserver (httpd.conf ) know where our plugin-config.xml file is located and we need to add a module in httpd.conf file. Restart the webserver and your webserver is ready.
I am assuming that you have completed following activities :
a. Installed WAS and have a Node federated under Dmgr profile. NodeAgent and server1 is running.
b. IHS and Plugin is installed.
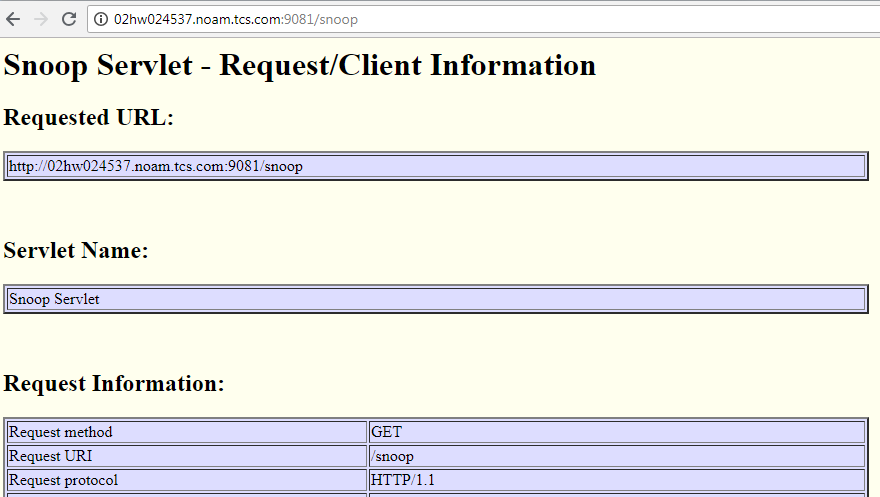
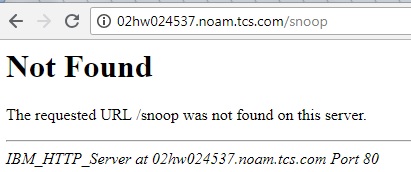
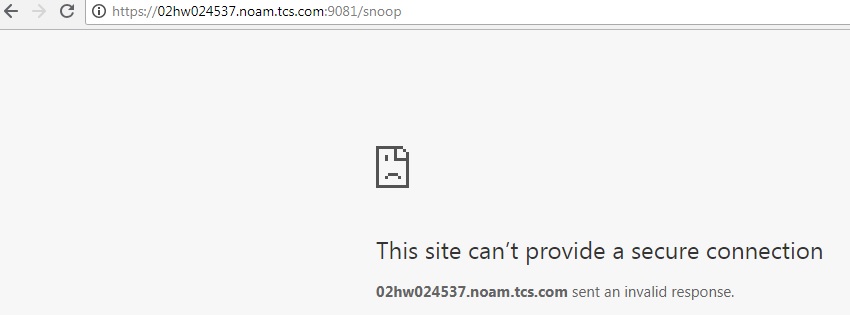
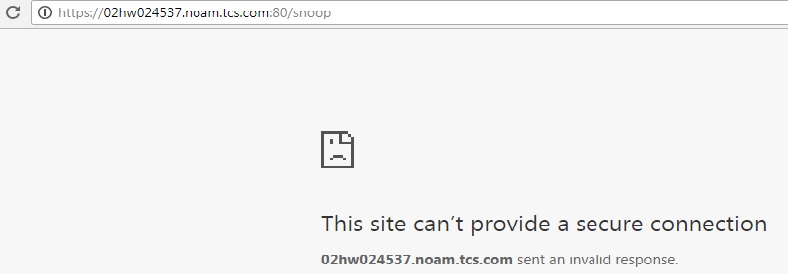
c. we are able to see below status of snoop when its requested through Application server and when its requested through webserver.
Snoop requested through WebServer and Appserver on Https & Http before configuring plugin between WebServer and Application Server.
Case A : Snoop request on Http through Application server.
Case B: Snoop request on http through webserver.
This page should start working once plugin is configured. Please follow the steps mentioned to configure the plugin.
Case C: Snoop request on https through Application Server
This will not work, untill SSL is not enabled between WebServer and Application Server. I will explain latter, how to configure SSL.
Case D: Snoop request through https on WebServer.
This will not work, untill SSL is not enabled between WebServer and Application Server. I will explain latter, how to configure SSL.
Steps to configure plugin.
Step1 : Generate plugin by issuing GenPluginCfg.bat
Example : C:\WebSphere\AppServer\profiles\Dmgr01\bin>GenPluginCfg.bat
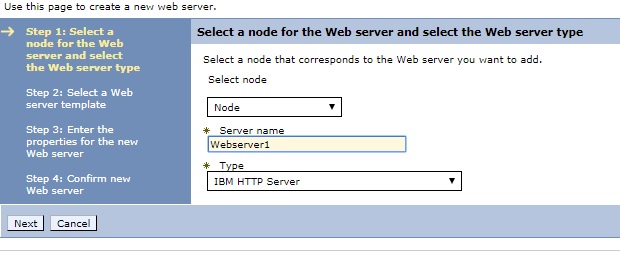
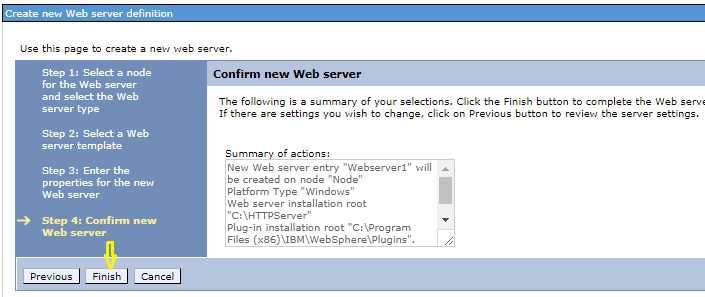
Step 2: Create a WebServer defination in Websphere Network Deployment.
Example : Follow the screenshots:
Now open httpd.conf file and add below mentioned two lined at the end of the file and restart the weserver.
LoadModule was_ap22_module "C:\Program Files (x86)\IBM\WebSphere\Plugins\bin\32bits\mod_was_ap22_http.dll"
WebSpherePluginConfig "C:\Program Files (x86)\IBM\WebSphere\Plugins\config\Webserver1\plugin-cfg.xml"
Test Case B URL

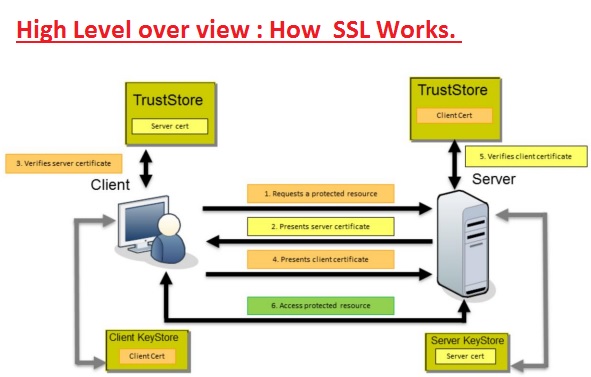
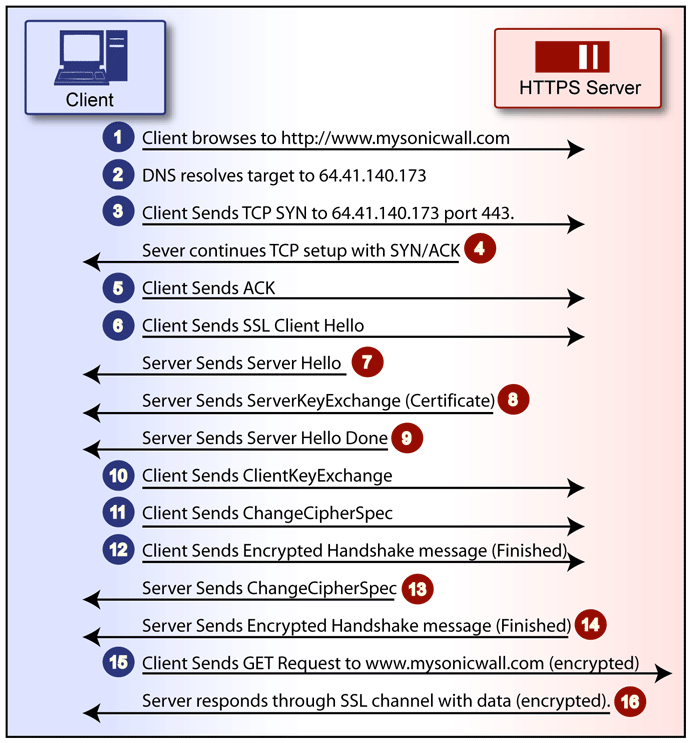
How SSL works between Browser to IHS and between IHS and WebSphere Application Server"
There are two most popular type of keystores:
JKS :
- Java key Store. Its java way of storing the relevant information.
- It is a repository of certificates (signed public keys) and [private] keys.
- Work on Java based servers.
- We need to use keytool to import certificates in .jks
- We can convert .jks keystore in PKCS keystore, if required.
keytool -importkeystore -srckeystore keystore.jks -destkeystore keystore.p12 -deststoretype PKCS12 -srcalias 1 -deststorepass password -destkeypass password
PkCS:
If you are looking for platform independent way to use Asymmetric key, P12 is your best choice. You can import them into any tool/platform without any issue and use native API to extract the public key (.CER).
I will prefer to share steps to configure SSL rather than giving theoretical knowledge. Theory, we can get from internet easily.
We will do following setup on WebSphere :
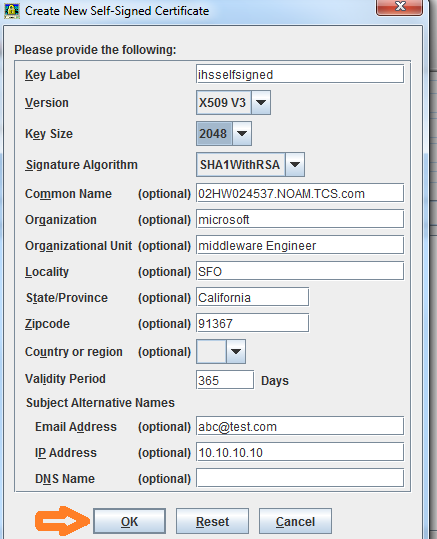
a. Creating a self signed digital certificate and configure IHS WebServer.
b. Configure WebServer truststoreto to allow inbound request served to IHS by WebSphere.
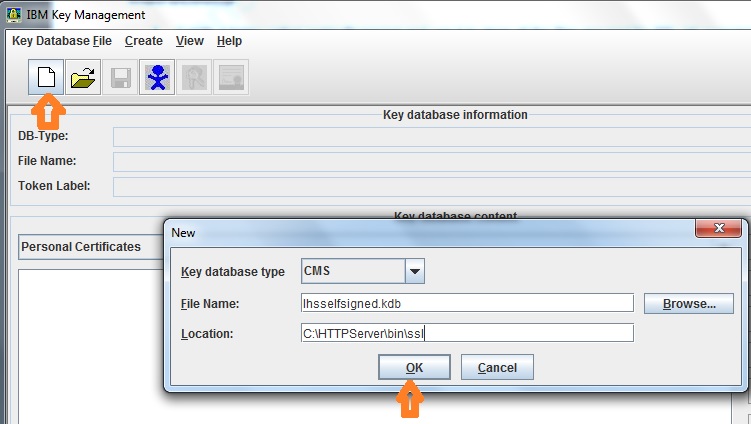
Step 1 : Create a directory/folder by name "ssl" under C:\HTTPServer\
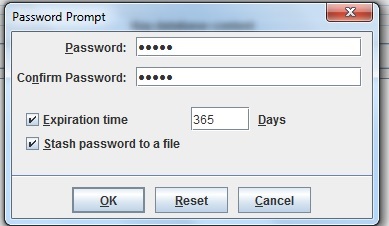
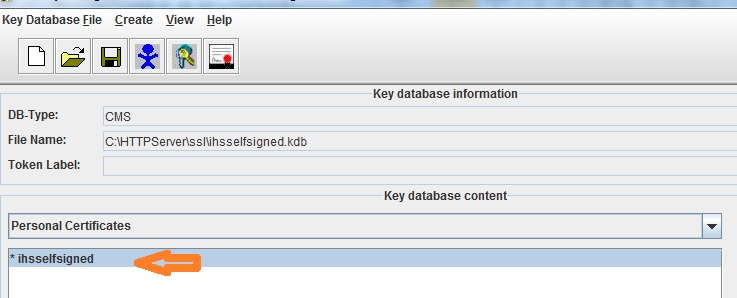
Step 2: Open ikeyman ( ikeyman.bat ) utility of IBM HTTP Server from /bin directory. Follow the self explanatory screenshots.
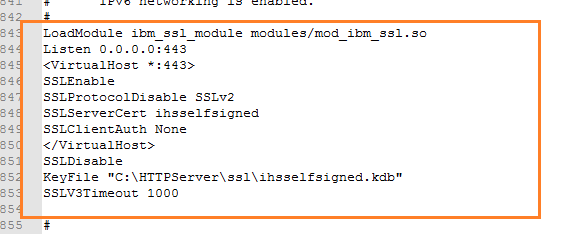
Step 3: Open httpd.conf and uncomment below mentioned lines. You will have to make two changes.
a. The string mentioned against SSLServerCert is the key label used while generating the digital certificate.
b. Make sure that KeyFile path is correct.
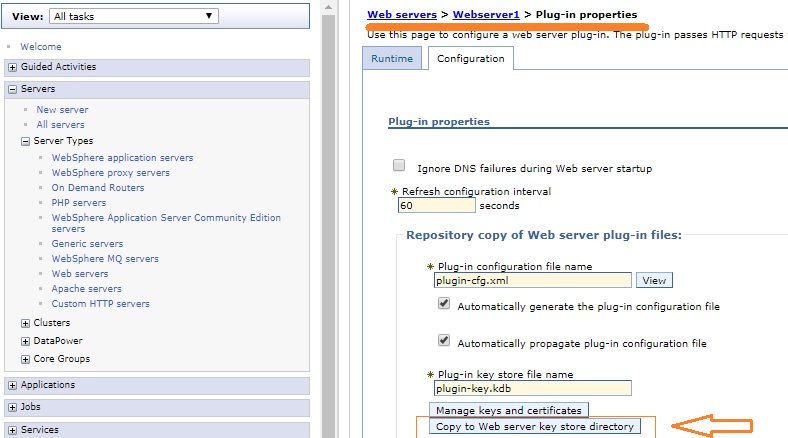
Click on <web_server_name> and then click on Plug-in properties .
Click on Copy to Web server key store directory button.
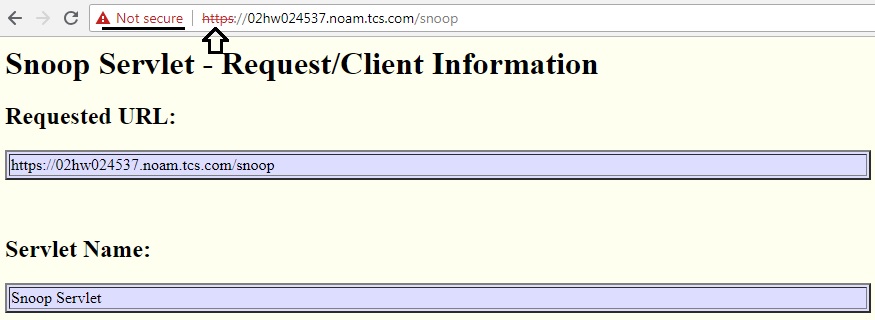
Step 4: Restart webserver and try to access the below mentioned url ( snoop on https) . It should work.
Step 5 : The self signed certificate is not trusted by default by the browsers.
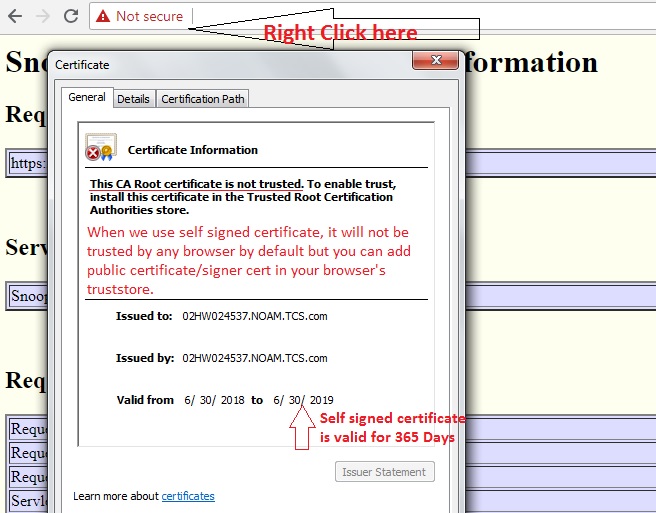
Step 6 : Export the public cert and import it in your browser's trust store.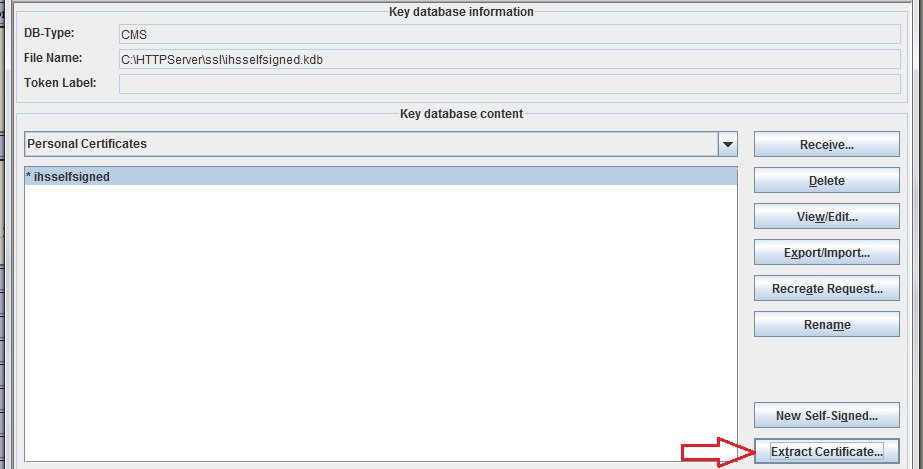
WebSphere Troubleshooting Scenarios - Most Common Issues
Invocation Target Exception: -->
Q: Installation was successful and when I am trying to start server it is giving “Invocation Target Exception” why you will get this issue and how you are trouble shooting this issue.
A: May be the problem with hostnames, hostnames are mismatched. Add the host name in etc/hosts file which you had given at the time of installation.
Admin Console Password not working: -->
A:
<WAS_INSTALL_DIR>/bin/> wsadmin -conntype NONE
wsadmin> securityoff
wsadmin> exit
Restart the servers.
Enable the security from administrative console.
Once the needed corrections are made, you can re-enable security in the admin console and then restart WebSphere.
JSSL0130E java.net.SocketTimeoutException:
When I start the Application server. I see the following error in Application server systemout.log and Nodeagent systemout.log:
Solution :
Step 1 : Log into admin console, do the following for all nodes:
Navigate to System Administration -> Deployment Manager -> ORB Service -> Custom Properties
Add the following properties:
| com.ibm.ws.orb.transport.SSLHandshakeTimeout=60000 |
Step 2 : Just uncomment the highlighted configuration on all nodes and restart the servers.
Renewing expired certificates on DMGR
Renewing expired SSL certificates in Websphere in some cases is problematic. There are not many functions available for manipulating aliases in keystores using Websphere admin console. And if certificate alias is used throughout your infrastructure mappings – for example in SSL Configurations and web chains fixing the entries with new alias could be cumbersome. Below are few easy steps to renew/replace ssl certificate in keystore while retaining same alias. General idea is to manipulate keystore and truststore using iKeyman utility instead of websphere admin console.
- Copy key.p12 and trust.p12 from Deployment Manager config (<DeploymentManager_profile\>config\cells\<cell_name>) to some separate backup directory
- Start iKeyman.bat uitlity from \bin directory in Deployment manager profile
- Open key.p12 from the backup directory and delete the certificate that you would like to replace in “Personal Certificates”
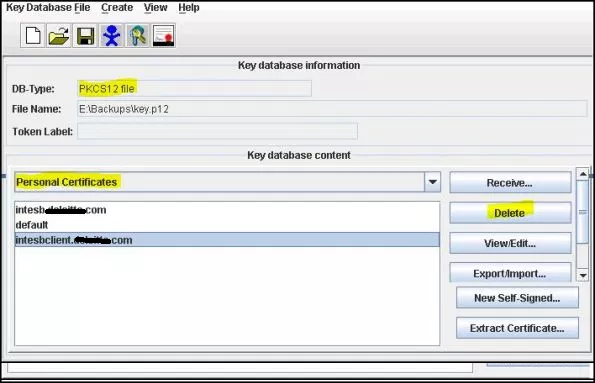
- Now import the new obtained from CA certificate to keystore “Personal Cerificates”
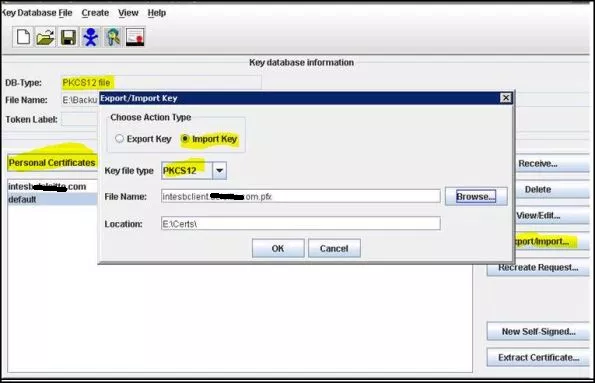
- When prompted to change label (it is GUID in case of Microsoft CA issuer), give it the same alias name as it was before. Click “Apply”, and “OK”

- You will see the new certificate with proper alias in the list of “Personal Certificates”
- Save the key.p12 file changes
Repeat same steps with trust.p12 file, but use .cer file instead of .pfx to import just public certificate part. And use “Signer Certificates” folder instead of “Personal Certificates”
Now that you have prepared both key.12 and trust.p12 files :
- Stop Deployment Manager\
- Copy new key.p12 and trust.p12 files to Deployment Manager config (<DeploymentManager_profile\>config\cells\<cell_name>)
- Start Deployment manager
And if you have option “Synchronize nodes on startup” you are done and could verify the new certificates in Websphere console. If not just synchronize the nodes and they will get the updated key and trust files.